Valentine’s Day Oreo Pops Recipe
This post may contain affiliate links.
Read our Disclaimer.
Leave a Comment ★★★★★
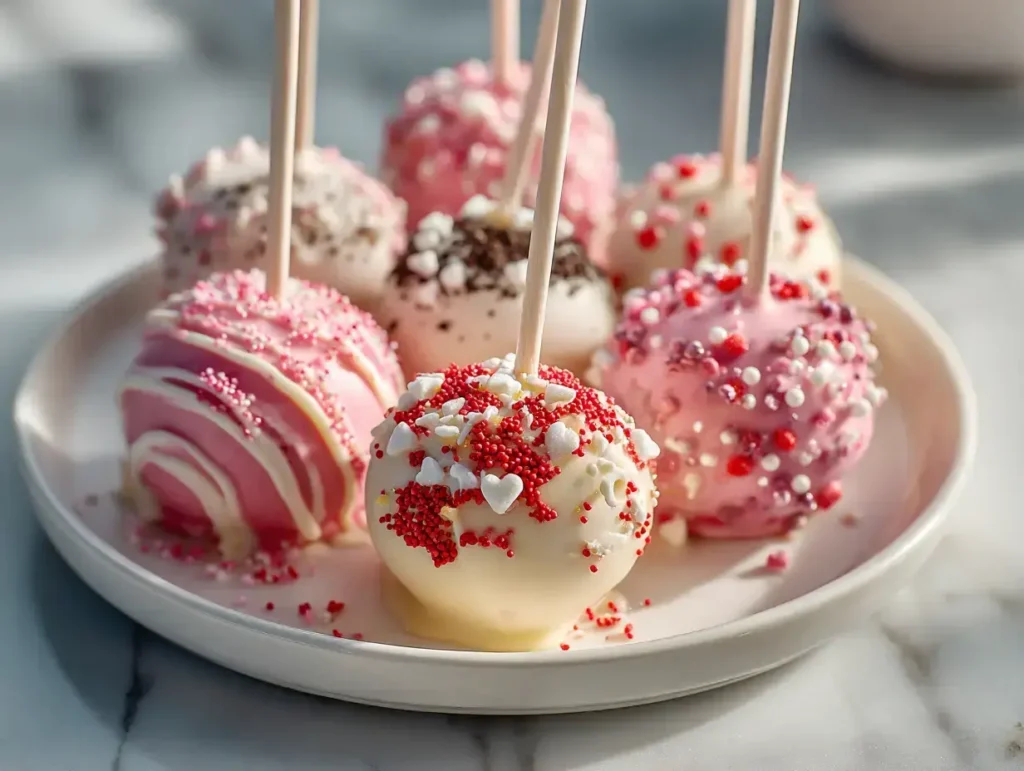
Creating Valentines Day Oreo Pops is a fantastic way to whip up adorable, romantic desserts that are sure to impress. These cute valentine desserts combine the beloved taste of Oreo cookies with a festive pink coating, making them perfect edible gifts or party favors for your celebration.


I love that these romantic desserts come together in a manageable timeframe, perfect for a cozy evening of kitchen creativity. With a prep time of just 40 minutes and only 5 minutes of active cooking, you can create these stunning Valentine’s day party food without spending your whole day in the kitchen.
The total time is about 1 hour and 45 minutes, which includes a crucial 60-minute rest period for the coatings to set. This hands-off time is perfect for cleaning up or preparing other Valentine’s day recipes for your celebration. The process is broken into simple stages, making it an ideal project for a relaxed weekend cooking ritual.
As someone who enjoys making treats accessible, I’ve found simple swaps to accommodate different dietary needs. For a lower sugar version of these Oreo cake pops, you can use sugar-free candy melts and a reduced-fat cream cheese alternative.
Portion control is also a great way to enjoy these homemade valentine treats while being sugar conscious. Consider making smaller, bite-sized Oreo balls to manage serving sizes. For a different flavor profile that’s still festive, you could experiment with natural sweetener options, though this may alter the texture slightly.
After making countless batches of these party favors, I’ve gathered some secrets for perfect results every time. Here are my top tips to ensure your Oreo pops are a stunning success.

While these are certainly an indulgence, it’s helpful to understand what you’re enjoying. These Oreo balls provide a good source of quick energy, thanks to the carbohydrates from the cookies and coatings.
The cream cheese adds a small amount of protein and calcium to these cute valentine desserts. Compared to many store-bought holiday candies, you have control over the ingredients, which is a benefit I always appreciate. For those interested, a single pop contains approximately 180-220 calories, making them a rich treat best enjoyed in moderation as part of a balanced approach to holiday eating.
If you’re looking to reduce the indulgence factor slightly, there are simple adjustments you can make. Using a reduced-fat cream cheese can lower the overall fat content while maintaining the creamy texture needed for these edible gifts.
Another option is to dip only half of each Oreo ball in the candy coating, creating a two-tone effect that uses less of the melted candy. You could also experiment with a dark chocolate coating, which often contains less sugar than candy melts. For more ideas on modifying sweet recipes, check out my tips for creating lighter brownies that apply similar principles.
I love creating a beautiful presentation for these romantic desserts. After hosting many Valentine’s gatherings, I’ve found that presentation truly elevates the experience. Arrange your finished Oreo cake pops in a tall vase filled with decorative Valentine’s-themed filler like red and pink shreds or heart-shaped confetti.
For a more rustic look, push the sticks into a foam block covered with festive wrapping paper. These treats pair wonderfully with fresh berries or a light fruit salad to balance their richness. They’re also fantastic alongside other Valentine’s day treats like chocolate covered pretzels or decorated sugar cookies for a diverse dessert table.

Even experienced cooks can encounter issues with chocolate-covered treats. Here are the most common pitfalls and how to avoid them for perfect Valentine’s Day Oreo Pops every time.
Why is my coating too thick? This usually happens if the candy melts overhear or if you don’t add enough shortening. Melt your coating gently in 30-second intervals and stir thoroughly between each burst of heat. The shortening helps achieve a dippable consistency.
How can I prevent the pops from falling off the sticks? The key is ensuring your Oreo balls are thoroughly chilled before dipping. The firmness from chilling helps the sticks stay securely in place. Also, avoid moving them excessively while the coating sets.
Why does my white chocolate drizzle seize up? White chocolate is notoriously sensitive to moisture. Make sure your bowl and utensils are completely dry, and consider adding a tiny bit of coconut oil instead of shortening if you’re having issues. For more troubleshooting tips, see my guide to working with chocolate successfully.
I remember my first batch where I rushed the chilling step and ended up with lopsided pops. Now I patiently wait the full 30 minutes, using that time to tidy up or prepare other elements of our Valentine’s celebration. This small delay makes all the difference in creating professional-looking chocolate decorations.
Proper storage ensures your beautiful creations stay fresh and delightful. These Oreo balls keep beautifully in the refrigerator for up to one week when stored in an airtight container. I like to separate layers with parchment paper to prevent them from sticking together.
For longer storage, these Valentine’s day treats freeze exceptionally well. Place them in a single layer on a baking sheet to freeze solid, then transfer to a freezer bag or container. They’ll keep for up to three months. When I make these as edible gifts, I often prepare them a week in advance and store them in the fridge until gift-giving day. If you’re making a large batch, you might also enjoy my tips for storing Rice Krispies treats which use similar principles.
There’s something incredibly satisfying about creating these beautiful treats from simple ingredients. I love how these Oreo pops bring people together—whether you’re making them with a partner, with kids, or as a special surprise for someone you love.
The process is genuinely enjoyable, and the results never fail to delight. These homemade valentine treats have become a cherished tradition in our home, and I hope they bring as much joy to your kitchen as they have to mine. The combination of familiar flavors with festive presentation makes them perfect for any Valentine’s celebration. If you enjoy these, you might also want to try your hand at Peanut Butter Blossoms, cut-out sugar cookies, or a classic Red Velvet Cake for other holiday occasions. Creating these Valentines Day Oreo Pops is a wonderful way to express your affection through the universal language of delicious food.
If you loved making these Oreo pops, you might enjoy exploring other festive recipes that bring the same joy to your kitchen. Here are more ideas for creating memorable sweet moments.
Classic Chocolate Chip Cookies – A timeless treat that pairs perfectly with a glass of milk for a cozy Valentine’s evening.
Texas Sheet Cake – Perfect for feeding a crowd with minimal effort, this rich chocolate cake is always a hit.
Fudgy Chocolate Brownies – For the chocolate lovers, these brownies deliver intense flavor with a perfect texture.
Deep Dish Brownie – An extra-thick and indulgent version that makes any occasion feel special.
Mummy Oreo Balls – Adapt this fun Halloween treat with Valentine’s colors for another easy no-bake option.
Yes, you can use chocolate chips or baking chocolate tempered with a small amount of coconut oil. Candy melts are specifically formulated to set firmly at room temperature, while chocolate may require refrigeration to maintain its shape. For your Valentines Day Oreo Pops, either option works, but candy melts provide that classic firm coating.
You can prepare these Valentine’s day treats up to one week in advance when stored properly in the refrigerator. They also freeze beautifully for up to three months. This make-ahead quality makes Valentines Day Oreo Pops perfect for planning your celebration without last-minute stress.
If you don’t have a food processor, place the Oreos in a heavy-duty zip-top bag and crush them with a rolling pin until you have fine crumbs. Then mix with the softened cream cheese in a bowl until well combined. The texture might be slightly less uniform, but your Valentines Day Oreo Pops will still be delicious.
Absolutely! Simply form the mixture into balls and dip them as you would for traditional Oreo balls. Without the sticks, they become elegant truffle-like treats perfect for plating. Both versions make wonderful Valentines Day Oreo Pops, so choose based on your preference and serving style.

Welcome to Mac Recipes! I'm here to prove that amazing home-cooked meals don't need to be complicated. From weeknight dinners to weekend treats, I create recipes that fit into your busy life—delicious, doable, and always worth making.
More About Me