Pistachio Kunafa
This post may contain affiliate links.
Read our Disclaimer.
Leave a Comment ★★★★★
My love for desserts that tell a story runs deep, and I am thrilled to share the magic behind this Pistachio Cream Kunafa Cheesecake. This recipe is a beautiful marriage of two beloved traditions: the rich, creamy texture of a classic American cheesecake and the fragrant, syrupy, and crunchy layers of Middle Eastern kunafa. The result is a stunning masterpiece perfect for a special gathering or a comforting treat. I will guide you through every step, from preparing the iconic shredded dough to whipping up the luscious pistachio cream filling. This Pistachio Cream Kunafa Cheesecake is destined to become a new family favorite.

Table of Contents
My first encounter with traditional kunafa in a small bakery years ago was a revelation. Meanwhile, my grandmother’s creamy cheesecake recipe holds a cherished place in my heart. Fusing these two iconic treats felt like a natural, delicious evolution. This dessert celebrates the best of both worlds, creating something uniquely wonderful for your table.
Kunafa, also spelled knafeh, is a beloved pastry found across the Middle East. Fundamentally, it features thin, thread-like kataifi pastry dough, which bakes into a wonderfully crisp and golden texture. Traditionally, it is soaked in a sweet syrup and filled with cheese or clotted cream. This Pistachio Cream Kunafa Cheesecake draws direct inspiration from those crunchy kunafa layers and sweet, nutty flavors.
The creamy, dense texture of a classic New York-style cheesecake provides a fantastic contrast to the flaky, buttery shreds of kunafa dough. Moreover, the tanginess of the cream cheese balances the incredible sweetness from the honey drizzle perfectly. This combination results in an Arabian fusion dessert that is both sophisticated and incredibly satisfying.
Using high-quality, specific ingredients is the absolute key to making an unforgettable Pistachio Cream Kunafa Cheesecake. Each component plays a vital role in building the final flavor and texture. I always recommend gathering everything before you start, a method that makes the entire process smooth and enjoyable.
The foundation of our dessert is the kunafa dough, often found in the freezer section as shredded phyllo dough. You must thaw it completely according to package directions. Coating every single strand with melted, unsalted butter is non-negotiable; it guarantees that deep golden brown and delightfully crunchy finish we all love.
Full-fat cream cheese is essential for a rich, non-grainy filling. Remember to let it soften at room temperature for easy mixing. Finely chopped, shelled unsalted pistachios infuse every bite with their distinct flavor and gorgeous green flecks. Heavy cream and whole milk combine to create the luxurious, smooth consistency that makes this Middle Eastern sweet cheese filling so divine.
You likely have most of these tools already, which makes this impressive dessert surprisingly approachable. Having the right equipment on hand streamlines your baking process and ensures perfect results every single time.
A 9-inch springform pan is absolutely crucial. Its removable sides allow you to release the cheesecake cleanly without damaging the beautiful kunafa crust. You will also need a sturdy electric mixer to achieve that perfectly smooth and lump-free pistachio cream filling. A good mixer incorporates air beautifully, creating a light yet rich texture.
Keep a good quality pastry brush on hand for greasing the pan with butter. You will also need a large mixing bowl for tossing the kunafa dough and a rubber spatula for scraping down the bowl and spreading the filling evenly. These simple tools make the preparation stages much easier and more efficient.
This initial step sets the stage for your entire Pistachio Cream Kunafa Cheesecake. Taking your time here ensures a crisp, buttery base and topping that won’t become soggy. The tactile process of working with the dough is actually quite fun and therapeutic.
First, move your package of kunafa dough from the freezer to the refrigerator the night before you plan to bake. When you are ready to begin, place the thawed dough in a large bowl. Gently use your fingers to separate the strands and break up any large clumps. This ensures the butter coats everything evenly for uniform baking.
Next, pour your melted unsalted butter over the separated dough. Use your hands to toss and massage the butter into the strands until every single piece is thoroughly coated. The mixture should feel moist and look crumbly. This butter barrier is what creates that signature crunchy kunafa layers we are aiming for.
The heart of this dessert is its spectacular creamy center. This no-bake pistachio cake filling comes together quickly but delivers an enormous amount of flavor. Using room-temperature ingredients is the secret to a silky-smooth, lump-free consistency.
Begin by beating the room-temperature cream cheese and granulated sugar together with your electric mixer on medium speed. Continue beating for a full 2-3 minutes until the mixture is completely smooth and the sugar has dissolved. Scrape down the sides of the bowl with a spatula to incorporate everything evenly. This careful start prevents a grainy texture in your final cheesecake.
Once your base is smooth, beat in the heavy cream, whole milk, and vanilla extract just until combined. Be careful not to overmix at this stage. Finally, gently fold in the finely chopped pistachios by hand. This distributes the nuts evenly without deflating the mixture, giving you that beautiful, speckled pistachio kunafa filling.
Layering is where your Pistachio Cream Kunafa Cheesecake truly takes shape. The goal is to create distinct, clean layers that hold together when sliced. A firm press is your best friend during this step to ensure a solid foundation and a stable top crust.
Take half of your buttered kunafa dough and press it firmly into the bottom of your prepared springform pan. Use your fingers or the flat bottom of a measuring cup to compact it into a solid, even layer. This base will support the heavy filling and become wonderfully crisp during baking. A solid base is key for all great baked kunafa variations.
Carefully pour your pistachio cream filling over the compacted base. Spread it into a smooth, even layer with your spatula. Evenly sprinkle the remaining buttered kunafa dough over the entire surface of the filling. Gently press it down to adhere, creating the top crust that will bake into a golden, crunchy covering.
Baking transforms the separate layers into a cohesive, glorious dessert. The key is achieving a deeply browned, crisp top while allowing the center to set without overbaking. Your kitchen will smell absolutely heavenly during this process!
Always preheat your oven to 350°F (175°C) for consistent results. Bake your cheesecake for 45-50 minutes. You are looking for a deep, golden brown color on the top kunafa layer. The center of the cheesecake will still have a slight jiggle when you gently shake the pan; this is perfect and means it will set firmly as it cools.
Once baked, remove the cheesecake from the oven and place the entire pan on a wire rack. You must let it cool completely to room temperature for at least 2 hours. This cooling period allows the structure to set properly, making it possible to slice cleanly. Rushing this step can cause a runny filling and a crumbly crust.
The final touches elevate your homemade kunafa with pistachios from great to extraordinary. A beautiful presentation makes sharing this dessert even more special. Furthermore, proper storage ensures you can enjoy its fantastic texture for days.
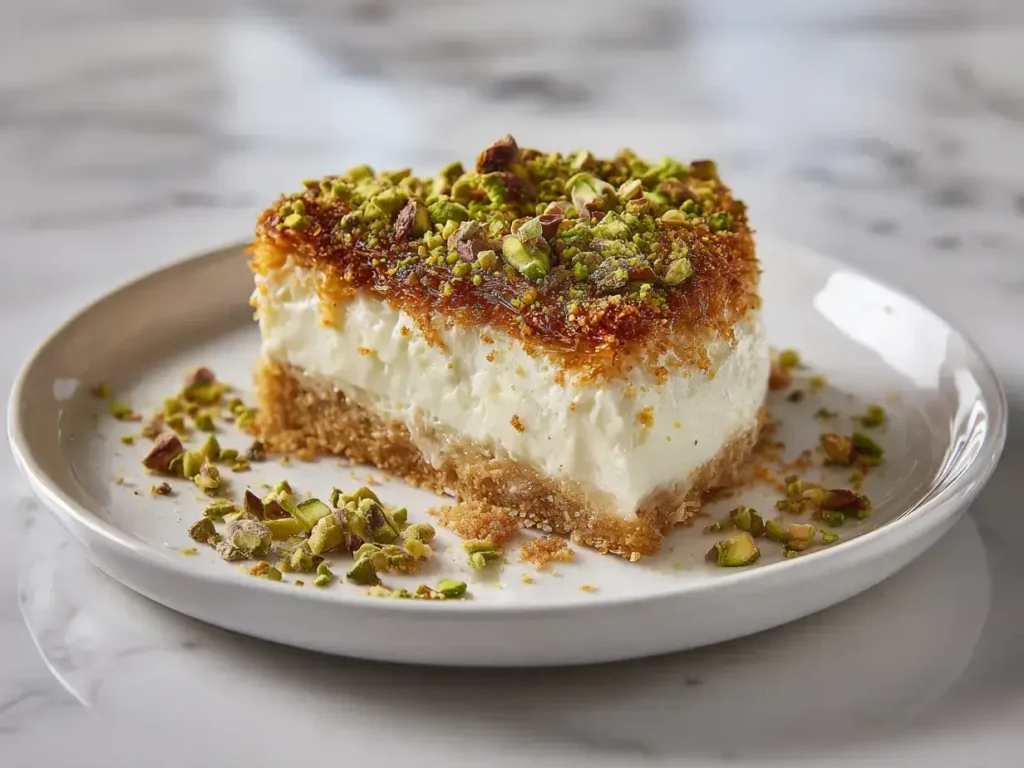
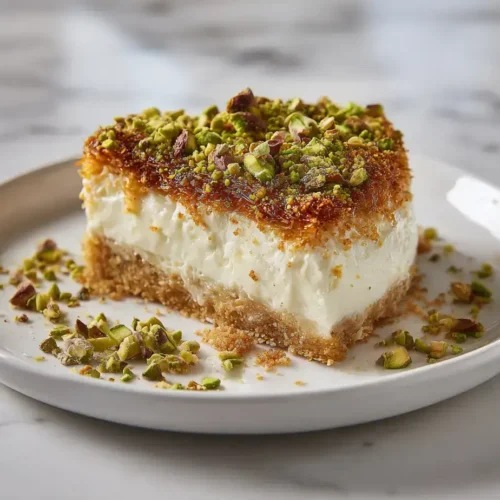
After the cheesecake is completely cool, drizzle the surface generously with honey. The honey acts as a classic syrup soaked kunafa element, adding shine and extra sweetness. Finally, scatter the roughly chopped pistachios over the top for a gorgeous color contrast and an added nutty crunch. It’s a beautiful sweet pistachio pastry ready for its debut.
Store any leftover Pistachio Cream Kunafa Cheesecake covered in the refrigerator for up to 4 days. The kunafa crust will soften slightly in the fridge but will still be delicious. For the best texture, I recommend serving it the same day it is baked. If you love make-ahead desserts, you should definitely try our Chocolate Easter Egg Nest Cake as well.

I strongly recommend using unsalted shelled pistachios. Salted pistachios can make the filling unpredictably salty and overpower the sweet, delicate balance of this cream cheese kunafa.
You can thaw it on the counter for a few hours, but do not use a microwave. The microwave will make the strands gummy and difficult to separate, which will ruin the texture of your crust.
A springform pan is ideal. However, in a pinch, you can use a deep 9-inch cake pan lined with parchment paper with overhanging edges to help lift the cheesecake out after cooling.
This specific Pistachio Cream Kunafa Cheesecake is best served at room temperature or slightly chilled. Serving it cold ensures the filling is perfectly set and easy to slice.
Absolutely! You can assemble and bake it a day ahead. Simply store it covered in the refrigerator and add the honey and pistachio garnish right before you serve it for the best presentation.
Look for kataifi dough in the freezer section of well-stocked grocery stores, international markets, or Middle Eastern specialty stores. It is sometimes labeled as “shredded phyllo dough.”
Creating this stunning Pistachio Cream Kunafa Cheesecake is a rewarding adventure in flavor and texture. Don’t be intimidated by the layers; just follow each step with care and confidence. This dessert is a true showstopper that celebrates the wonderful world of fusion baking. I hope it brings as much joy to your kitchen as it does to mine. Share it with loved ones and create your own sweet memories. If you enjoy this, you might also love our creamy Coconut Cream Pie or our classic Boston Cream Pie for another delicious experience. Happy baking!

Welcome to Mac Recipes! I'm here to prove that amazing home-cooked meals don't need to be complicated. From weeknight dinners to weekend treats, I create recipes that fit into your busy life—delicious, doable, and always worth making.
More About Me