Buttery Peach Upside Down Cakes
This post may contain affiliate links.
Read our Disclaimer.
Leave a Comment ★★★★★

There’s a certain kind of magic in baking that takes me right back to my grandmother’s kitchen in Burgundy. The scent of ripe peaches and caramelizing sugar filling the air is a memory I hold dear. Today, I want to share that warmth with you through these irresistible Peach Upside Down Cakes. These individual treats are not just a dessert; they’re little bites of summer comfort, perfect for sharing after a family dinner or enjoying with a cup of tea. They capture the essence of a classic upside down peach cake but in a wonderfully personal size.

Table of Contents
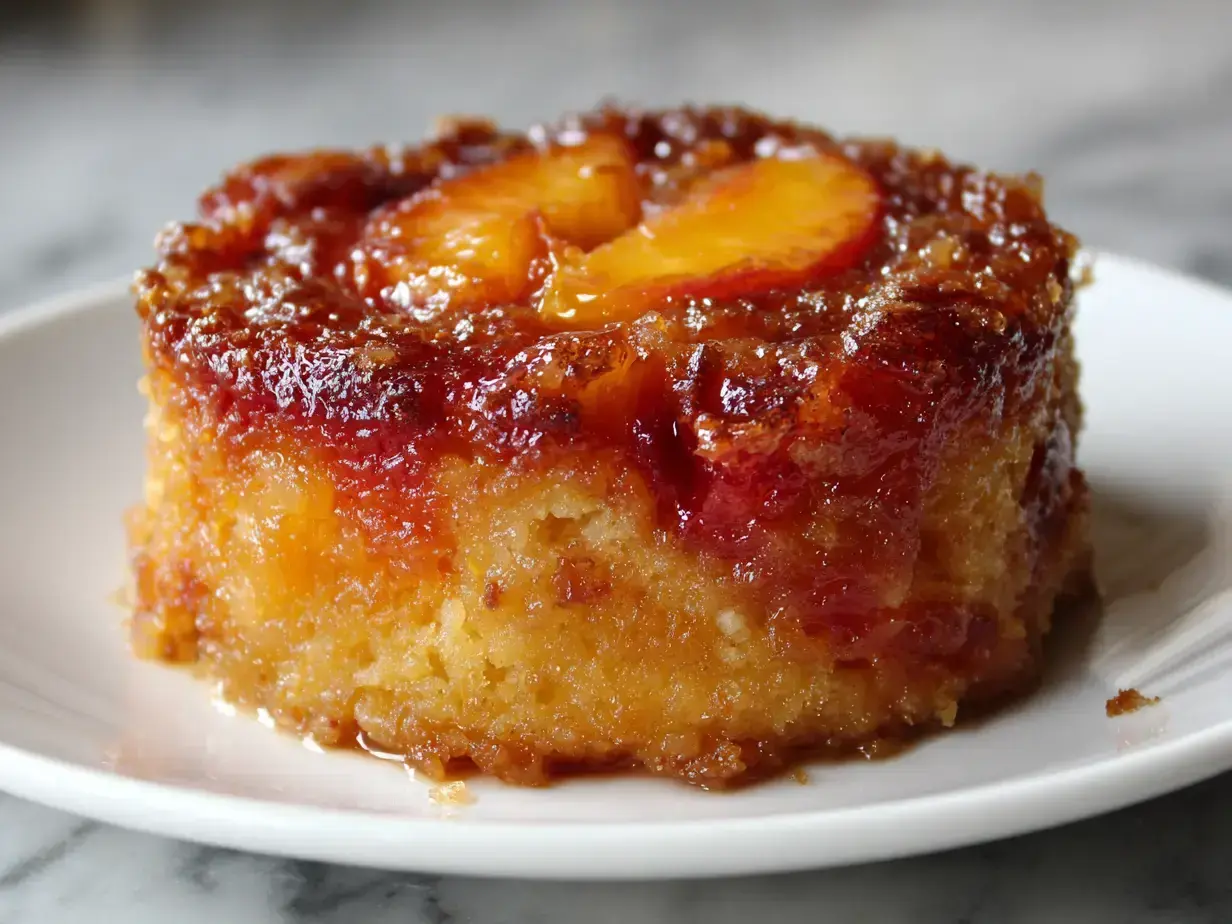
Honestly, what’s not to love about a dessert that’s as beautiful as it is delicious? These little cakes are a guaranteed crowd-pleaser. First of all, making a homemade peach upside down cake from scratch fills your home with an incredible aroma that promises something special. Furthermore, the process is surprisingly straightforward, making it an easy peach upside down cake project even for a beginner baker. The satisfaction of flipping the pan to reveal that glistening, caramelized peach top is a moment of pure joy every single time.
While a large cake is wonderful, there’s something uniquely charming about individual desserts. Consequently, these Peach Upside Down Cakes are perfect for parties, as everyone gets their own perfectly portioned treat. Moreover, they bake more quickly than a full-sized cake, meaning you can go from mixing bowl to table in under an hour. This makes them an ideal last-minute dessert that looks like you spent all day in the kitchen.
The magic of the upside down method naturally creates an incredibly moist cake. The fruit juices and rich caramel soak into the cake batter as it bakes, resulting in a tender crumb that simply melts in your mouth. For instance, using ripe, juicy peaches is the secret to achieving that signature texture. If you adore a moist peach upside down cake, this recipe will quickly become your new favorite.
Using high-quality ingredients is the first step toward baking success. For the best flavor, I always recommend using ripe, in-season peaches when you can find them. Their natural sweetness and juiciness are unmatched. However, don’t worry if they’re not available; well-drained canned peaches can work in a pinch. Let’s talk about the key players that make this a best peach upside down cake.
For a truly spectacular fresh peach upside down cake, choose peaches that are fragrant and yield slightly to gentle pressure near the stem. I find that freestone peaches are easier to slice, but cling peaches work just fine with a little patience. Remember, the quality of your fruit directly influences the final dessert, so pick the best you can find. This attention to detail is what makes a classic peach upside down cake so memorable.
We use both granulated and brown sugar in this recipe to create a complex, caramel-like flavor. The combination of melted butter and sugar at the bottom of the pan is what creates that iconic sticky topping. Meanwhile, using unsalted butter gives you complete control over the saltiness of your dessert. This simple mixture is the foundation of any great brown sugar peach upside down cake.
You don’t need a kitchen full of fancy equipment to make these cakes. A few standard tools will set you up for success. Of course, a reliable muffin tin is the most important item. I prefer a standard non-stick tin, but a well-greased regular tin works perfectly. Additionally, an electric mixer makes creaming the butter and sugar a breeze, though a strong arm and a whisk can do the job.
Accurate measurements are crucial in baking. So, I always use nested measuring cups for dry ingredients and a liquid measuring cup for the milk and melted butter. Furthermore, a set of mixing bowls in various sizes is incredibly helpful for keeping ingredients organized. A rubber spatula is also your best friend for scraping every last bit of batter into the pan.
While this recipe is designed for muffin tins, you can absolutely adapt it for a delicious skillet dessert. If you want to try a skillet peach upside down cake, simply use a 10-inch cast-iron skillet. You’ll need to adjust the baking time slightly, but the method remains largely the same. The skillet gives it a wonderfully rustic, old fashioned peach upside down cake feel.
This step is where the visual magic begins. Taking the time to arrange the peach slices carefully pays off beautifully when you flip the cakes. First, make sure your peach slices are of relatively uniform thickness so they cook evenly. Then, have fun creating a pattern in each muffin cup. A simple spiral or slightly overlapping fan shape works wonderfully and makes each cake look professionally made.
The caramel layer is deceptively simple. You just mix melted butter and sugar together. However, the key is to divide it evenly among the cups so every cake has a consistent, gooey topping. As a result, each bite of your Peach Upside Down Cakes will have the perfect balance of sweet cake and rich caramel. It’s the heart of the peach upside down cake recipe.
After peeling your peaches, slice them into wedges about 1/4-inch thick. Then, gently press the slices into the sugar-butter mixture in each cup. Importantly, try to cover the bottom completely to ensure a gorgeous result. This careful preparation is what transforms a simple peach upside down cake into something extraordinary.
The batter for this cake is a classic vanilla butter cake, and it’s the perfect vehicle for the peach topping. The goal is a light, tender crumb that complements the fruit without overpowering it. Firstly, remember to have your butter, eggs, and milk at room temperature. This simple step helps the ingredients emulsify properly, giving you a smoother batter and a more even bake.
Creaming the softened butter and sugar together is a critical step. You want to beat them until the mixture is pale, light, and fluffy. This process incorporates air into the batter, which helps the cakes rise. Therefore, don’t rush this part; a full three minutes of mixing makes a significant difference in the texture of your peach upside down cake from scratch.
Once your butter and sugar are creamed, you’ll alternate adding the dry ingredients and the milk. Always start and end with the flour mixture. This method helps prevent the batter from curdling and ensures everything is well-combined without overmixing. For example, overmixing can develop the gluten in the flour, leading to a tougher cake, so mix just until the flour disappears.
Now, let’s walk through the entire process from start to finish. Following these steps will guide you to perfect little cakes every time. I’ve baked this peach cake recipe countless times, and this method has never failed me. So, preheat your oven and let’s get started on creating your new favorite dessert.
First, preheat your oven to 350°F (175°C). Then, generously grease 8 cups of a standard muffin tin with butter or non-stick spray. Next, in a small bowl, mix the 1/4 cup of granulated sugar with the 2 tablespoons of melted butter. After that, divide this mixture evenly among the prepared muffin cups, spreading it into a thin, even layer. Finally, arrange your peach slices in a single, slightly overlapping layer over the sugar mixture in each cup.
Now, whisk together the flour, baking powder, and salt in a medium bowl. Then, in a separate larger bowl, cream the softened butter and remaining sugar until light and fluffy. Next, beat in the eggs one at a time, followed by the vanilla. After that, alternately add the flour mixture and the milk, beginning and ending with flour. Then, divide the batter evenly over the peaches. Bake for 20-25 minutes, until golden. Finally, let the cakes cool in the pan for just 5 minutes before inverting them onto a rack. This patience is key to a clean release!
A few simple tricks can elevate your baking from good to great. For instance, always use an oven thermometer to check that your oven temperature is accurate. An oven that runs hot or cool can affect baking time and texture. Additionally, rotate your muffin tin halfway through the baking time if your oven has hot spots, ensuring all your Peach Upside Down Cakes bake evenly.
The most nerve-wracking part is the flip, right? To guarantee a perfect release every time, don’t let the cakes cool completely in the pan. Instead, let them rest for only 5 minutes. This allows the caramel to set slightly but is still warm enough to loosen from the pan. Then, place a wire rack over the top of the muffin tin and flip it over in one confident motion. If any peaches stick, gently nudge them back into place.
This recipe is wonderfully adaptable. You can easily substitute the peaches with other fruits like plums, apricots, or pineapple rings. If you love the idea of a plum dessert, you might enjoy the flavors in our NYT Original Plum Torte. For a nutty crunch, sprinkle a handful of chopped pecans or walnuts over the caramel layer before adding the peaches. The possibilities are endless once you master the basic technique.
These cakes are best served warm, when the caramel is still gooey and the cake is tender. A scoop of vanilla bean ice cream or a dollop of lightly sweetened whipped cream is a classic and delicious pairing. The contrast of the warm cake and cold ice cream is simply divine. For a special occasion, a drizzle of caramel sauce takes it over the top.

If you have any leftovers (a rare occurrence in my house!), let the cakes cool completely. Then, store them in an airtight container at room temperature for up to two days. For longer storage, you can keep them in the refrigerator for up to four days. I find that gently reheating them in the microwave for 10-15 seconds before serving brings back that fresh-from-the-oven warmth and softness.
You can absolutely freeze these cakes for a taste of summer later on. Firstly, wrap each cooled cake individually in plastic wrap. Then, place them in a freezer-safe bag or container. They will keep well for up to three months. When you’re ready to enjoy, thaw them overnight in the refrigerator and then warm them slightly. It’s a wonderful trick for easy entertaining, much like having a batch of no-bake peanut butter bars on hand.
Yes, you can! Make sure to drain the canned peaches very well and pat them dry with a paper towel to remove excess syrup. This will prevent the topping from becoming too watery.
This usually happens if the cakes cool for too long in the pan. For a clean release, invert the cakes after just 5 minutes of cooling. Also, ensure you greased the pan thoroughly.
Absolutely. Use a 9-inch round cake pan and increase the baking time to 35-45 minutes, or until a toothpick inserted into the center comes out clean.
A dense cake is often caused by overmixing the batter after adding the flour. Mix just until the ingredients are combined. Also, check that your baking powder is fresh.
I don’t recommend frozen peaches for this recipe unless you thaw and drain them extremely well. They release a lot of water during baking, which can make the topping soupy.
The upside-down method is classic! You might also enjoy making a festive chocolate nest cake, which uses a different but equally fun presentation.
I hope this recipe for Peach Upside Down Cakes brings as much joy to your kitchen as it has to mine. It’s a timeless, comforting dessert that celebrates the simple pleasure of baking with fresh fruit. So, gather your ingredients, preheat your oven, and create a little bit of homemade magic. I’d love to hear how your cakes turn out—happy baking!

Welcome to Mac Recipes! I'm here to prove that amazing home-cooked meals don't need to be complicated. From weeknight dinners to weekend treats, I create recipes that fit into your busy life—delicious, doable, and always worth making.
More About Me