Easy Chocolate Spider Cake
This post may contain affiliate links.
Read our Disclaimer.
Leave a Comment ★★★★★
Autumn leaves crunch underfoot and the air turns crisp, and I always find myself craving a fun baking project that brings smiles to everyone’s faces. This Chocolate Spider Cake is my absolute favorite treat to make for Halloween. It’s wonderfully creepy, delightfully delicious, and so much simpler to create than it looks! With a rich, moist chocolate cake base, a silky chocolate frosting, and those adorable spider decorations, this cake is always the star of the party. Best of all, it’s a fantastic activity to do with kids, turning an afternoon of baking into a spooky memory you’ll cherish. Let’s make a show-stopping chocolate Halloween cake that will have everyone talking!

Table of Contents
This creepy chocolate dessert is more than just a treat; it’s an experience. Firstly, it combines the timeless appeal of a rich chocolate cake with the playful fun of a Halloween theme, making it perfect for both kids and adults. Moreover, the recipe is incredibly straightforward, relying on simple pantry staples. You don’t need to be a professional baker to achieve impressive results! Furthermore, it’s a versatile centerpiece. Whether you’re hosting a spooky Halloween party or celebrating a spider themed birthday cake, this creation fits right in.
Baking should be a joy, not a chore. This easy spider cake recipe is designed for inclusivity. Children love pressing in the pretzel legs and placing the cookie bodies, fostering creativity and laughter in the kitchen. Meanwhile, the adults get to enjoy a seriously delicious slice of moist chocolate cake that doesn’t sacrifice flavor for fun. It’s the best of both worlds!
Don’t let the elaborate look fool you. The technique for the chocolate buttercream spiderweb and the assembly is surprisingly simple. You achieve a professional-looking, black icing cake without any special piping skills or expensive tools. In fact, the decoration comes together in minutes, leaving you with a stunning result that will garner countless compliments.
Simple ingredients yield extraordinary results. For the cake base, you will need all-purpose flour, which provides a sturdy yet tender crumb. Granulated sugar sweetens the deal, while unsweetened cocoa powder delivers that deep, authentic chocolate flavor we all crave. Baking soda is our leavening agent, helping the cake rise to perfection, and a bit of salt balances all the sweetness beautifully. The wet ingredients are just as simple: water, vegetable oil, white vinegar, and vanilla extract. The vinegar reacts with the baking soda for a fantastic lift.
Each component plays a vital role. The combination of oil and water, for instance, guarantees a supremely moist cake that stays tender for days. The white vinegar might seem unusual, but it’s the secret weapon. It reacts with the baking soda to create bubbles, making the cake light and fluffy without any metallic aftertaste. Always use a good quality vanilla extract; it rounds out the chocolate flavor wonderfully.
For the best chocolate spider cake, quality matters. Choose a high-quality unsweetened cocoa powder; it makes a significant difference in the depth of chocolate flavor. Similarly, a pure vanilla extract will always outperform imitation. However, remember this is a forgiving recipe. If you only have apple cider vinegar, it will work just fine as a substitute for the white vinegar.
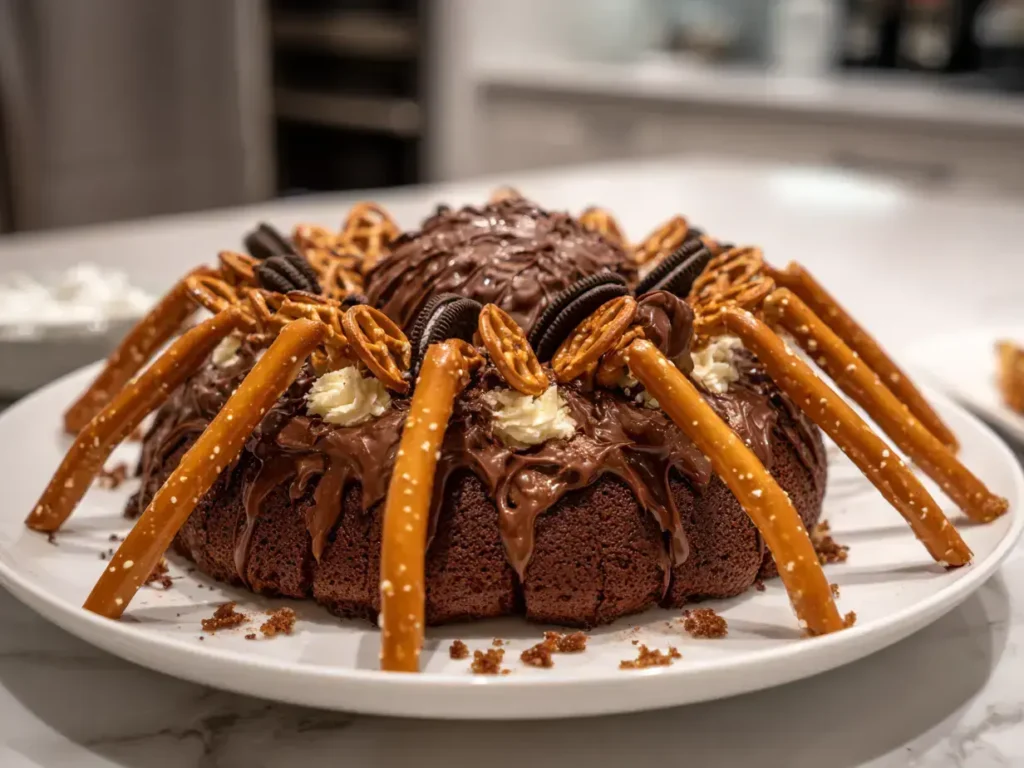
The decoration is what transforms a simple chocolate cake into a Halloween masterpiece. For the frosting, a prepared chocolate frosting is a fantastic time-saver. You can use your favorite store-bought brand or whip up a quick homemade version if you prefer. The toppings are where the magic happens: chocolate sandwich cookies become the spider bodies, and thin pretzel sticks form the eight legs for each little creature.
Whether store-bought or homemade, your frosting needs to be spreadable. A creamy chocolate frosting works best for creating that smooth canvas for your spiders. If you’re feeling ambitious, you could even make a chocolate ganache spider cake by using a rich ganache instead, which would add another layer of decadent flavor.
The spiders are delightfully simple to create. Just twist apart the chocolate sandwich cookies and scrape off the cream filling. You’ll use the two cookie halves for two spider bodies. Break the thin pretzel sticks in half to get the perfect length for the legs. You’ll need four halves (eight pieces) per spider. This process is quick, easy, and a fantastic job for little helpers!
You won’t need any specialized equipment for this chocolate fudge spider cake. A standard 9-inch round cake pan is ideal for the job. A large mixing bowl and a whisk are essential for combining your dry ingredients thoroughly. A rubber spatula is perfect for folding the wet and dry ingredients together without overmixing. For baking, an oven thermometer is a great tool to ensure your oven is at the correct 350°F. Finally, an offset spatula or a simple butter knife will help you spread the frosting smoothly.
Your standard kitchen tools will do the trick. A good quality cake pan ensures even baking and easy release. A wire cooling rack is crucial for allowing the cake to cool completely before frosting; if you frost a warm cake, the frosting will melt and slide right off. Having these basic tools ready makes the process seamless and enjoyable.
While not strictly necessary, a few tools can make things even easier. Parchment paper lining the bottom of your cake pan guarantees a flawless release every single time. A kitchen scale for measuring your flour can provide more consistent results than using cup measurements. Ultimately, though, your enthusiasm is the most important tool you have!
Let’s get baking! First, preheat your oven to 350°F (175°C). Then, grease your 9-inch round cake pan with butter or nonstick spray, and lightly dust it with flour. This prevents sticking and helps you get a clean cake release later. In a large bowl, whisk together your dry ingredients: the flour, sugar, cocoa powder, baking soda, and salt. Make a well in the center of these dry ingredients.
Next, pour all your wet ingredients—water, vegetable oil, white vinegar, and vanilla extract—into the well. Use your spatula to gently fold everything together until the batter is smooth and no streaks of flour remain. Be careful not to overmix. Pour the batter into your prepared pan and spread it evenly. Bake for 30-35 minutes, or until a skewer inserted into the center comes out clean.
Your batter will be thin, and that is perfectly normal! This is a key characteristic of this particular cake recipe, contributing to its moist and tender texture. Don’t be tempted to add more flour. Just ensure you mix until everything is *just* combined. Overmixing can develop gluten, leading to a tougher cake, which nobody wants.
The toothpick test is your best friend. Insert a wooden skewer or toothpick into the very center of the cake. If it comes out with a few moist crumbs attached, that’s fine. However, if it comes out with wet batter, it needs more time. Oven temperatures can vary, so start checking at the 30-minute mark. Once done, let the cake cool completely in the pan on a wire rack.
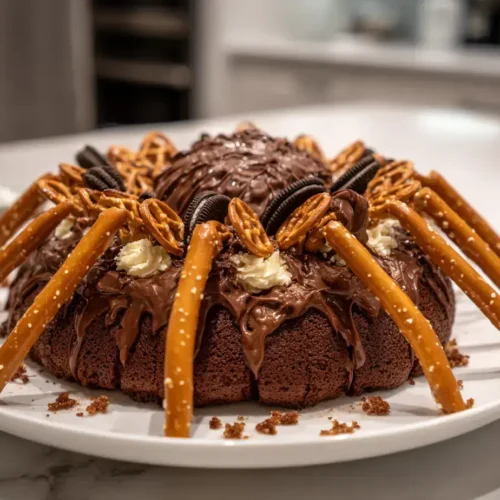
This is the most fun part! Once your cake is completely cool, take your container of chocolate frosting and spread it evenly over the top using an offset spatula or a knife. Aim for a smooth, even layer—this is the web for our spiders to crawl on. Now, take your chocolate sandwich cookies. Twist them apart carefully and use a knife to scrape off the cream filling.
Place these cookie halves, cream-side down, onto the frosted cake to form the spider bodies. Space them out so each spider has room. Now, take your thin pretzel sticks and break each one in half. You will have 32 shorter pieces. Press two pretzel pieces into the frosting on each side of a cookie body to form eight legs. Repeat for all your cookies, and your scary dessert recipes are complete!
For an extra touch of spooky elegance, consider adding a chocolate spiderweb cake design. Simply melt a small amount of white chocolate or white frosting, put it in a piping bag or a zip-top bag with a tiny corner snipped off, and pipe concentric circles on the dark frosting. Then, use a toothpick to drag lines from the center to the edge to create a classic web pattern. It’s an easy way to make your chocolate cake with spiderweb frosting even more impressive.
If your pretzel legs break, don’t worry! Just use another piece. The beauty of this design is its rustic, homemade charm. If the frosting is too stiff to press the pretzels into, let it sit at room temperature for a few more minutes to soften. The goal is to have fun and be creative—there’s no wrong way to make your chocolate spider cake.
Your Halloween party cake is ready to serve! You can present it right on the counter or a cake stand. Use a sharp knife to slice it into portions, wiping the blade clean between cuts for neat slices. This cake pairs wonderfully with a glass of cold milk or a cup of coffee. It’s rich, so smaller slices are often perfect for kids after a night of trick-or-treating.
If you have leftovers (which is rare!), you’ll need to store them properly. Cover the cake tightly with plastic wrap or place it in an airtight container. It will stay fresh at room temperature for up to 2 days. The pretzels may soften slightly over time, but the cake will still taste delicious. For longer storage, you can refrigerate it for up to 5 days.

This cake is fantastic for making ahead. You can bake the cake layer up to two days in advance. Simply let it cool completely, then wrap it tightly in plastic wrap and store it at room temperature. Frost and decorate the cake the day you plan to serve it for the freshest presentation and the crunchiest pretzel legs. This makes party planning so much easier.
You can also freeze the unfrosted cake for longer storage. Wrap the cooled cake layer tightly in a layer of plastic wrap and then a layer of aluminum foil. It will keep in the freezer for up to 3 months. Thaw it overnight in the refrigerator and then bring it to room temperature before frosting and decorating. I don’t recommend freezing the decorated cake, as the frosting and pretzels won’t hold up well.
While this chocolate spider cake is perfect as-is, baking is all about creativity! For a different flavor profile, you could use a coconut-pecan frosting instead of chocolate. Alternatively, turn it into a red velvet cake by swapping some cocoa for red food coloring for a bloody Halloween twist. The decorating possibilities are endless, too.
If you want to focus on the web, try a different technique. After frosting the cake, pipe a spiral of white icing starting from the center. Then, take a knife and gently drag it from the center to the edge all the way around the cake. Then, drag from the edge to the center between those lines. This creates a detailed web that’s perfect for your chocolate buttercream spiderweb.
Get creative with your spiders! Instead of cookies, use round black candies or even large chocolate chips for the bodies. For the legs, you could use black licorice strings or even piped black frosting. If you’re making this for a birthday, you could use colorful cookies and pretzels to match a party theme. It’s your creepy chocolate dessert—make it your own!
Absolutely! You can substitute the all-purpose flour with a 1:1 gluten-free baking blend. Also, ensure your cocoa powder, baking soda, and other ingredients are certified gluten-free. For the decorations, check that your cookies and pretzels are gluten-free versions, which are widely available now.
This could be due to old or expired baking soda. Baking soda loses its potency over time. Otherwise, make sure you didn’t overmix the batter after adding the wet ingredients, as this can deflate the bubbles that help it rise. Always check the expiration date on your leavening agents!
For a naturally black frosting, you can use activated charcoal powder. However, use it sparingly and know that it can have a slight gritty texture. Alternatively, a very dark chocolate frosting made with dark cocoa powder will look almost black against the light cookie spiders, achieving a similar creepy effect.
Yes, you can bake this in a 9×13 inch sheet pan for a thinner cake. The baking time will be less, so start checking for doneness around 20-25 minutes. You’ll have more surface area for even more spiders! For another great sheet pan idea, check out our classic Texas sheet cake.
If your pretzels are too brittle, try pressing them into the frosting at a slight angle instead of straight down. You can also use a toothpick to pre-poke a small hole in the frosting where you want each leg to go. This gives the pretzel a guide and reduces the pressure needed to insert it.
For more Halloween fun, try making our monster cookie brownies or some eerie Oreo-stuffed brownies. They’re both deliciously spooky and always a huge hit with crowds of all ages during the holiday season.
Baking this Chocolate Spider Cake is about so much more than creating a dessert. It’s about crafting joy, sharing laughter with your family, and making holiday traditions that stick. This easy spider cake recipe proves that you don’t need complicated techniques to make something truly special and memorable. I hope this cake becomes a beloved part of your Halloween celebrations, just as it has in my home. So preheat that oven, gather your little helpers, and create a deliciously spooky memory today. Happy baking!

Welcome to Mac Recipes! I'm here to prove that amazing home-cooked meals don't need to be complicated. From weeknight dinners to weekend treats, I create recipes that fit into your busy life—delicious, doable, and always worth making.
More About Me