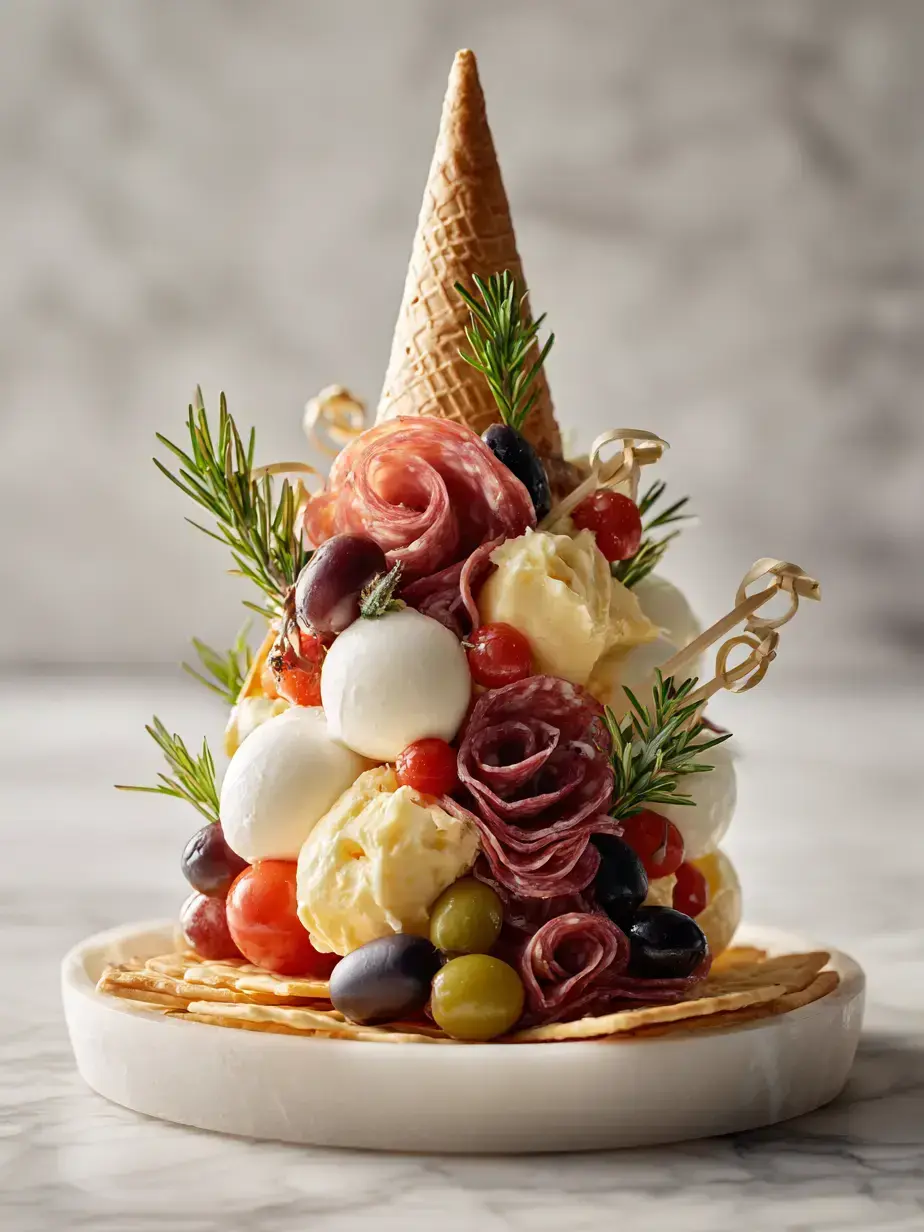
Creating a stunning Charcuterie Tree Cone transforms your holiday table into a festive centerpiece with minimal effort. This edible display combines savory cheeses, salty cured meats, and vibrant fruits for a spectacular presentation. It’s the perfect party appetizer that guests will adore, ready in just forty minutes without any cooking required.
The holiday season always inspires me to create edible art that brings people together. I first assembled this festive cheese tree for a Christmas Eve gathering, and its dramatic flair instantly became a tradition. The aroma of fresh rosemary mingling with savory prosciutto creates an unforgettable sensory experience. I love pairing it with other make ahead dishes like my cheesy garlic rolls or a simple stracciatella soup for a complete festive meal. It’s a wonderful centerpiece that makes any occasion feel special, much like the joy of baking cranberry orange cookies for friends.
Why This Charcuterie Tree Cone Shines
- Stunning Visual Impact: This edible Christmas tree becomes an instant conversation piece on any holiday table.
- Effortless Assembly: No cooking required means you can focus on presentation and guest enjoyment.
- Customizable Ingredients: Easily adapt the selections to accommodate various tastes and dietary preferences.
- Perfect Party Portioning: The vertical design allows guests to graze without crowding the appetizer spread.
Gathering Your Charcuterie Tree Supplies
Be sure to see the recipe card below for the full listing of ingredients, instructions, notes, and estimated nutritional information.
Foundation & Proteins
- 12-inch Styrofoam cone: Ensure it is food safe to prevent any contact issues with edible items.
- Sharp cheddar cheese block: Cubes provide sturdy anchors and bold flavor throughout the tree.
- Fresh mozzarella balls: Their soft texture and mild taste offer a lovely contrast to harder cheeses.
- Hard salami slices: Folding them creates dimension and visual interest on the lower branches.
- Prosciutto Thinly sliced and rolled for an elegant, delicate appearance among the heavier elements.
- Pepperoni slices: Use these smaller pieces to fill gaps and add pops of color and spice.
Produce & Garnish
- Green and red grapes: They introduce natural sweetness and a beautiful color variation.
- Cherry tomatoes: Choose firm tomatoes that will stay securely attached to the toothpicks.
- Kalamata and green olives: Their briny flavor cuts through the richness of the cheeses and meats.
- Fresh rosemary sprigs: These are essential for mimicking the look of fragrant Christmas tree needles.
- Wooden toothpicks: You will need a generous amount to securely fasten all components.
- Assorted crackers: Serve these around the base for easy pairing with the tree’s offerings.
Charcuterie Tree Cone
Create a stunning Charcuterie Tree Cone with cheeses, cured meats, fruits, and olives. Perfect holiday appetizer that serves as a festive centerpiece for any gathering.
Prep Time 40 minutes mins
Total Time 40 minutes mins
Course Appetizer
Cuisine American
Servings 12 servings
Calories 280 kcal
cutting board
knife
measuring cups
small bowls
serving platter
Base & Tools
- 1 12-inch Styrofoam cone, food-safe
- 150 wooden toothpicks approximately 150 to 200
Cheeses
- 1 16-ounce block sharp cheddar cheese cut into 1/2-inch cubes
- 1 8-ounce package fresh mozzarella balls (bocconcini) small, drained
Cured Meats
- 4 ounces hard salami thinly sliced, folded into quarters
- 3 ounces prosciutto thinly sliced, rolled tightly
- 3 ounces pepperoni slices small
Fruits & Olives
- 1 cup green grapes washed and dried
- 1 cup red grapes washed and dried
- 1 cup cherry tomatoes washed and dried
- 1/2 cup pitted Kalamata olives drained
- 1/2 cup pitted green olives drained
Garnishes & Serving
- 1 bunch fresh rosemary sprigs for garnish
- 1 box assorted crackers for serving
Place the 12-inch Styrofoam cone onto a sturdy serving platter or a flat, stable surface. Arrange all your charcuterie ingredients into separate small bowls or containers for easy access after washing and drying any produce.
Beginning at the bottom edge of the cone, insert a wooden toothpick into a 1/2-inch cheddar cheese cube and then firmly into the cone. Continue this process around the entire base with a mix of cheddar cubes and fresh mozzarella balls, placing them snugly against each other to completely cover the cone’s surface without large gaps.
Once the foundational cheese layer is established, start adding the folded hard salami and rolled prosciutto slices. Secure each piece by inserting a toothpick through the meat and into the cone, distributing them evenly among the cheeses to create a varied texture and color.
Fill in the next section of the cone with the washed green and red grapes, cherry tomatoes, and both types of pitted olives. Use toothpicks to attach these items, working your way upward and ensuring the cone is becoming densely covered with a vibrant assortment.
Add the small pepperoni slices, using toothpicks to secure them in any remaining small gaps or exposed areas of the Styrofoam cone. Continue to fill any visible spaces with smaller pieces of cheese, grapes, or olives to create a full, abundant “tree” effect.
Tuck the fresh rosemary sprigs into various spots around the cone. The rosemary will resemble the needles of a Christmas tree, adding a festive touch and a fresh, aromatic scent to your display.
Arrange the assorted crackers attractively around the base of the charcuterie cone on the serving platter. Take a moment to inspect the entire cone for any loose items or areas that need further filling, adjusting as necessary before serving immediately.
Add mozzarella or feta for a cheesy twist. Ensure the cone is stable before building.
Keyword appetizer, charcuterie, cone, holiday
Creative Twists for Your Appetizer Tree
- Mediterranean Theme: Substitute meats with marinated artichoke hearts, roasted peppers, and feta cheese cubes.
- Sweet and Savory Blend: Incorporate dried figs, apricots, and honey drizzled nuts for a festive touch.
- All Cheese Version: Create a spectacular cheese tree using various shapes, colors, and textures of cheese alone.
My Pro Tips for a Perfect Display
- Sturdy Base: Place your cone on a heavy platter or board to prevent tipping during assembly and serving.
- Strategic Assembly: Work from the bottom up, ensuring each layer is full before moving higher to avoid gaps.
- Color Distribution: Intentionally place items like red grapes and tomatoes to create a balanced, festive look.
- Secure Attachment: Insert toothpicks at a slight upward angle to help items stay in place longer.

Keeping Your Charcuterie Cone Fresh
- Store: Disassemble the tree and store components separately in airtight containers in the refrigerator for up to 3 days.
- Freeze: Cheese and meats can be frozen for up to 2 months, though the textures may change slightly upon thawing.
- Reheating: This display is meant to be served cold; reassemble with chilled ingredients just before your event.
- Make-Ahead Tip: You can cube cheeses and prepare the meats a day in advance to streamline assembly.
Frequently Asked Questions
Can I make a charcuterie tree cone ahead of time?
I recommend assembling your festive cheese tree no more than 2-3 hours before serving to keep everything fresh and prevent the ingredients from drying out. You can prep all components in advance, which makes final assembly very quick. For longer parties, you can occasionally mist the rosemary sprigs with a little water to keep them looking vibrant.
What can I use instead of a foam cone?
For a completely edible base, you can shape aluminum foil into a cone and wrap it tightly in parchment paper. Another option is to use a sugar cone or a large waffle cone, though these are smaller. The key is ensuring the structure is stable enough to hold the weight of the ingredients.
How do you keep a charcuterie tree from falling over?
A heavy, stable base is crucial. Choose a substantial wooden board or a weighted platter. When assembling, distribute the weight evenly around the cone, placing heavier items like cheese cubes lower on the tree. Insert toothpicks at a slight upward angle, which provides better grip than straight-in placement.
What is the best cheese for a charcuterie tree?
Firm cheeses that hold their shape are best, like cheddar, gouda, manchego, or Swiss. Softer cheeses like brie can be used in small wedges if well-chilled. I love combining different colors and textures, similar to the variety found in my cheesy garlic rolls, for visual appeal.
More Festive Party Ideas to Try
Make This Charcuterie Tree Cone Tonight
This DIY charcuterie display brings such joy and elegance to holiday entertaining with its beautiful, abundant appearance. The combination of flavors and textures ensures there is something for every guest to enjoy. I hope this edible Christmas tree becomes a cherished part of your festive celebrations, creating memories around good food and great company.