Easy Yogurt Making Guide
This post may contain affiliate links.
Read our Disclaimer.
Leave a Comment ★★★★★
Making Greek Yogurt at home is a simple, rewarding process that connects you to generations of kitchen wisdom. My Nonna always said the secret wasn’t in fancy equipment, but in patience and love. This traditional recipe unlocks the magic of fermentation, turning simple milk into a thick, probiotic-rich treat.


Now, let’s talk timing. Good things, especially yogurt, cannot be rushed. The active prep time is quite short, about 30 minutes of your attention. The real magic happens during the slow fermentation, which takes 6 to 12 hours.
This hands-off period is when the live cultures work their magic. The total time, including chilling, is a lesson in patience, but the reward is a superior homemade yogurt. For a quicker breakfast treat that uses yogurt, my overnight oats are ready after a night in the fridge.
In our family, we believe everyone should enjoy good food. If you’re sugar-conscious or managing your glycemic intake, this recipe is wonderfully adaptable. The honey is entirely optional, allowing you to control the sweetness.
For a completely sugar-free version, simply omit the honey or use a natural sweetener like stevia. The tangy flavor of the plain yogurt is delicious on its own, especially when paired with fresh berries.
Over the years, I’ve learned a few tricks that make all the difference. First, ensure your starter yogurt is at room temperature. This helps it blend smoothly into the warm milk without shocking the delicate cultures.

This homemade Greek Yogurt is a powerhouse of nutrition. It’s an excellent source of protein and calcium, important for strong bones. The live cultures introduced during the fermentation process support a healthy gut, making this a truly probiotic yogurt.
Compared to many store-bought versions, you avoid unwanted additives and control the sugar content. For another gut-friendly recipe, try these vegan chia pudding cups. You can learn more about the benefits of probiotics from Harvard Health. For a delicious way to enjoy it, these chocolate strawberry yogurt clusters are a family favorite.
If you’re watching your fat intake, you can certainly make this recipe with low-fat or skim milk. The result will be a tangier, less creamy yogurt, but it’s still wonderfully healthy. You can also explore using plant-based milks, though the fermentation process may differ.
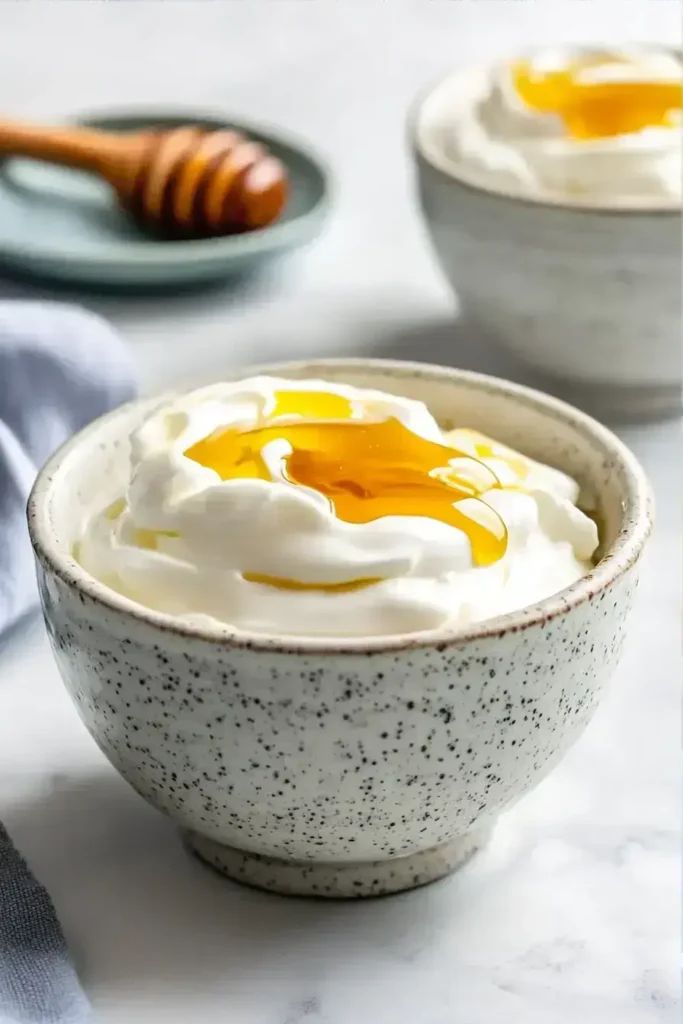
In my home, a bowl of creamy yogurt was the start of a good day. I love serving it swirled with a little honey and topped with toasted walnuts, just like my grandmother did. It’s a simple breakfast that feels like a hug.

For a beautiful parfait, layer it with granola and fresh berries. It’s also the perfect base for a creamy peanut butter smoothie or a refreshing cucumber melon smoothie.
Even with a simple recipe, little missteps can happen. The most common mistake is adding the starter culture when the milk is too hot. If the milk is above 110°F, you risk killing the live cultures, and the fermentation process won’t begin.
Another issue is not using a fresh, active starter. Always check the expiration date on your store-bought yogurt. For more troubleshooting on creamy desserts, see tips for avoiding cracks in cheesecake. Impatience is the third mistake. Don’t jiggle the jars during the fermentation period! Let the cultures work in peace. You can read about the science of yogurt fermentation from UGA. I remember my first batch failed because I kept checking on it. Now I know to trust the process, just like my no-bake raspberry cheesecake bars that need time to set.
Once your yogurt is thick and tangy, store it in a clean, airtight container in the refrigerator. It will keep well for up to two weeks. Remember, you can use a portion of it as a starter for your next batch, continuing the beautiful cycle of homemade yogurt making.
There’s a special pride that comes from making your own yogurt. It connects you to an ancient tradition of food preservation and care. This recipe is a gift from my family to yours, made with love and generations of knowledge.
I encourage you to try it this weekend. Once you taste the creamy, authentic flavor of your own Greek Yogurt, you’ll understand why it’s a tradition worth keeping. For more family recipes, you might enjoy my vegan berry parfait, apple walnut parfaits, or strawberry chia pudding.
If you loved making this yogurt, here are a few other simple, wholesome recipes that bring comfort to the table.
Mini Cheesecake Bombs – Bite-sized delights perfect for a sweet treat without the fuss.
Classic Mini Cheesecake Bombs – Another version of our family-favorite no-bake dessert.
Coconut Quinoa Pudding – A wonderfully creamy and nutritious breakfast or dessert.
Vegan Peach Smoothie – A refreshing and vibrant drink packed with fruity flavor.
Greek Yogurt is strained to remove whey, resulting in a thicker, creamier texture and higher protein content compared to regular yogurt. This homemade yogurt making process allows you to control the final thickness.
Yes, you can use ultra-pasteurized milk. It may actually simplify the process because it requires less heating. Just warm it to the correct temperature for adding the starter culture to begin the fermentation process.
Check the label of the yogurt you use as a starter. It must specify that it contains “live and active cultures.” This is essential for successful fermentation to create your own probiotic yogurt.
Thin yogurt can result from a short fermentation time, a weak starter culture, or not straining it. For a thicker Greek Yogurt, let it ferment for the full 12 hours and consider straining it through a cloth.

Welcome to Mac Recipes! I'm here to prove that amazing home-cooked meals don't need to be complicated. From weeknight dinners to weekend treats, I create recipes that fit into your busy life—delicious, doable, and always worth making.
More About Me