Chewy Brown Butter Chocolate Cookies
This post may contain affiliate links.
Read our Disclaimer.
Leave a Comment ★★★★★
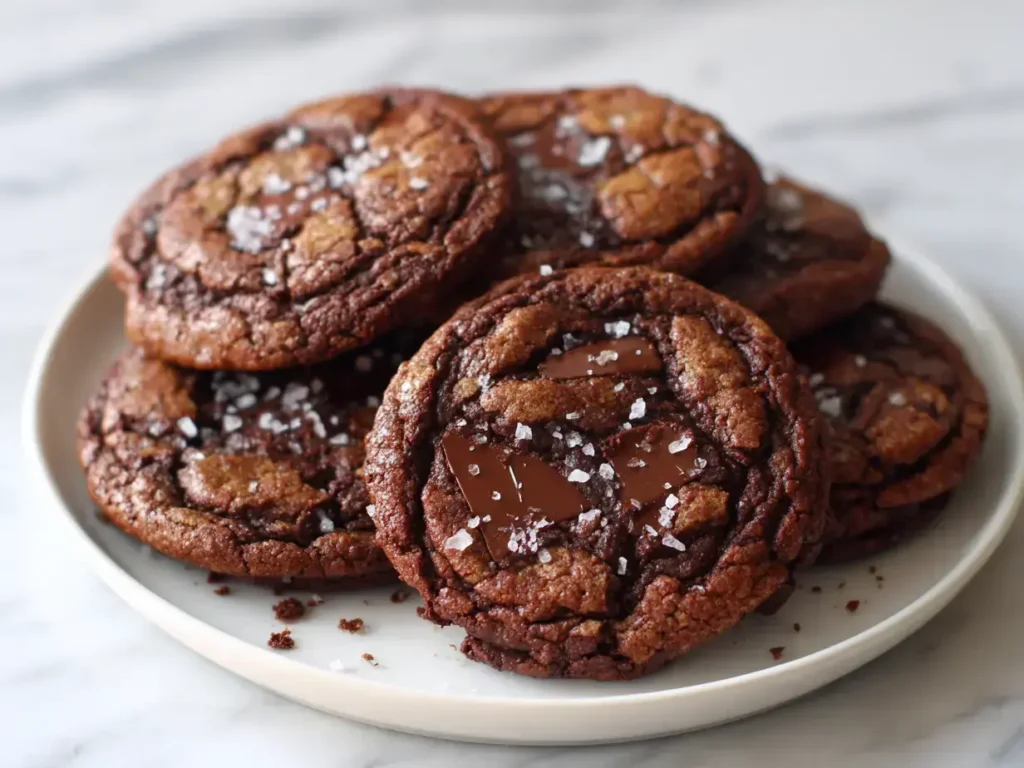
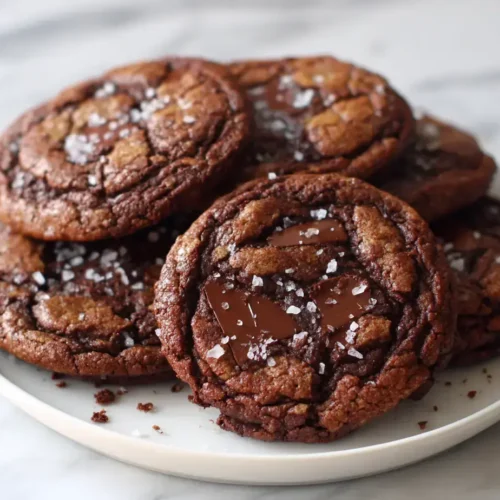
If you’re searching for a cookie recipe that feels like a warm hug, you’ve found it. My Brown Butter Chocolate Cookies are my absolute favorite treat to bake, especially on a cozy afternoon. The secret, of course, is that deeply nutty, rich flavor that only brown butter can provide. It transforms a simple chocolate cookie into something truly extraordinary. I remember the first time I tried browning butter; the kitchen smelled like heaven, and the resulting cookies vanished in minutes. This recipe is my perfected version, promising a chewy center, crisp edges, and pockets of melted chocolate in every single bite. Let’s create some magic together.

Table of Contents
So, what makes these Brown Butter Chocolate Cookies so special? It all comes down to that one simple yet transformative step. Browning butter might sound fancy, but it’s just gently cooking it until the milk solids toast, creating a nutty, caramel-like aroma and flavor. This process adds an incredible depth that you simply can’t get from melted or softened butter alone. Consequently, it makes these cookies taste gourmet without requiring a long list of complicated ingredients.
Browned butter works its magic by caramelizing the milk solids in the butter. As the water content evaporates, the flavors concentrate and the solids turn a beautiful golden brown. The result is a rich, toasty note that complements the sweetness of the brown sugar and the bitterness of the chocolate perfectly. It’s the same technique I use in my decadent Brown Butter Brookie recipe, where it adds a sophisticated twist. Ultimately, this one step is the difference between a good cookie and an unforgettable one.
The science is wonderfully straightforward. When you heat butter, the Maillard reaction occurs—the same chemical process that gives seared steak and toasted bread their delicious flavor. You’ll see the butter melt, then foam, and finally, you’ll spot those tiny brown specks at the bottom of the pan. That’s your signal of success! That nutty aroma filling your kitchen is a sure sign you’re on the right track to making the best browned butter cookies.
Using high-quality ingredients is key to achieving the best results for your Brown Butter Chocolate Cookies. Each component plays a specific role in creating the perfect texture and flavor. For instance, the right sugar affects chewiness, and the type of chocolate determines how it melts. Let’s break down why each item on the list is so important.
I always recommend using unsalted butter so you can control the salt level precisely. For the sugar, light brown sugar is non-negotiable. Its molasses content is essential for that moist, chewy texture we all love in chewy chocolate chip cookies. Pack the brown sugar firmly into your measuring cup for an accurate amount that delivers the right sweetness and consistency.
All-purpose flour provides the ideal structure. Meanwhile, baking soda gives the cookies their lift. For the chocolate, I strongly prefer finely chopped semisweet chocolate over chips. Chips contain stabilizers to hold their shape, but chopped chocolate creates beautiful, irregular pools of melty goodness. It’s a trick I also use in my ultimate fudgy chewy brownies for maximum chocolate impact.
Don’t be intimidated by browning butter! It’s a simple process that just requires a bit of attention. Follow these steps closely, and you’ll master it on your first try. The payoff for your Brown Butter Chocolate Cookies is absolutely worth it.
First, cut your butter into tablespoon-sized pieces and place them in a light-colored saucepan. Using a light-colored pan makes it much easier to see the color change. Heat over medium heat, swirling the pan occasionally. The butter will melt, then foam, and you’ll start to see golden specks forming at the bottom. Once it smells wonderfully nutty, immediately pour it into a heatproof bowl to stop the cooking. This prevents it from burning, which can happen in seconds.
This is a critical step you don’t want to rush. After browning, the butter is far too hot to add to the other ingredients. Let it cool for about 15 minutes. It should be warm to the touch but not hot. If you add it while it’s too hot, it could melt the sugar prematurely or cook the egg, which would ruin the texture of your brown butter chocolate chip dough. Patience here ensures a creamy, emulsified base.
Now for the fun part—bringing the dough together! This stage is all about technique to achieve that ideal cookie texture. We want a dough that bakes up chewy on the inside with slightly crisp edges.
Once your browned butter has cooled, add the packed brown sugar to the bowl. Beat them together with a mixer on medium speed for a full two minutes. This step is crucial for incorporating air and dissolving the sugar. Next, add the room-temperature egg and vanilla. Beating for another minute or two until the mixture is light and creamy is what gives the cookies a lovely texture. A room-temperature egg blends in much more smoothly than a cold one.
In a separate bowl, whisk together the flour, baking soda, and fine sea salt. Gradually add this to the wet ingredients, mixing on low speed just until no dry flour remains. Overmixing at this point can lead to tough cookies. Then, gently fold in the chopped chocolate. Finally, cover the bowl and chill the dough for at least 30 minutes. Chilling is non-negotiable; it solidifies the butter, preventing the cookies from spreading too much in the oven. If you love cookies with a great texture, you’ll appreciate my tips for perfectly chewy lemon cookies which also rely on proper chilling.
Baking is where your patience pays off. A few simple techniques will guarantee your Brown Butter Chocolate Cookies come out of the oven looking and tasting bakery-quality.
Once your dough is chilled, preheat your oven to 350°F (175°C). Line your baking sheets with parchment paper for easy cleanup and to prevent sticking. Use a cookie scoop or two tablespoons to portion the dough. Roll each portion into a smooth ball and place them on the sheet, leaving about 2 inches of space between each one. This space is vital because the cookies will spread as they bake. Crowding the pan leads to uneven baking and cookies that merge together.
Bake the cookies for 10-12 minutes. You’re looking for golden brown edges while the centers still look slightly soft and underdone. They will continue to cook on the hot baking sheet after you take them out. This is the secret to a soft, chewy center. As soon as they come out of the oven, sprinkle them with a pinch of flaky sea salt. The salt cuts through the sweetness and makes the chocolate flavor pop, just like it does in these irresistible s’mores bars.
If, by some miracle, you have leftover Brown Butter Chocolate Cookies, you’ll want to store them properly to maintain their freshness. Luckily, they keep wonderfully.
Once the cookies are completely cool, store them in an airtight container at room temperature. They will stay soft and delicious for up to 5 days. For extra moisture, you can add a piece of bread to the container; the cookies will absorb the moisture from the bread, keeping them chewy. This is a fantastic trick for all your favorite homemade chocolate cookies.
This dough freezes exceptionally well! You can scoop the dough balls onto a baking sheet, freeze them solid, and then transfer them to a freezer bag. They can be baked directly from frozen; just add a minute or two to the baking time. This means you can have warm, fresh brown butter desserts anytime a craving strikes. Baked cookies also freeze well for up to 3 months. Simply thaw at room temperature or warm them in the oven for a few minutes. For more great make-ahead tips, check out my guide for easy peanut butter bars.
While this recipe for Brown Butter Chocolate Cookies is perfect as is, it’s also a fantastic base for getting creative. Feel free to add your own favorite mix-ins and flavors.
You can replace half of the chocolate with an equal amount of other goodies. Try toasted walnuts or pecans for a crunchy contrast. Or, mix in some dried cherries or cranberries for a sweet-tart surprise. For a truly decadent treat, swap the semisweet chocolate for dark chocolate chunks or even white chocolate. The brown butter pairs beautifully with almost anything, much like it does in these fun candy bar blondies.
For a gluten-free version, use a 1:1 gluten-free all-purpose flour blend. I’ve had great results with several brands. If you need a dairy-free option, you can try browning a high-quality plant-based butter, though the flavor profile will be slightly different. Always check that your chocolate is dairy-free if necessary. These simple swaps mean everyone can enjoy these gourmet chocolate chip cookies.
These cookies are sublime on their own, but serving them with a little flair makes any occasion special. Here are a few of my favorite ways to enjoy them.
You can’t go wrong with a classic glass of cold milk alongside a warm Brown Butter Chocolate Cookie. The combination is timeless. For us adults, a hot cup of coffee or a cold glass of milk is a fantastic pairing. The bitterness of the coffee highlights the deep, toasty notes of the brown butter. They are also incredible crumbled over a scoop of vanilla bean ice cream for an instant decadent dessert.
For a party or holiday gathering, stack these cookies on a beautiful cake stand for a charming display. They make a wonderful addition to a cookie platter alongside other favorites like festive cinnamon roll sugar cookies or adorable reindeer brownie bites. Their gourmet appearance and incredible flavor will definitely make them the star of the show.

You can, but I don’t recommend it. Using unsalted butter gives you complete control over the saltiness. If you only have salted butter, simply reduce the added fine sea salt in the recipe by about a quarter teaspoon.
The most common reason is not chilling the dough long enough. Chilling solidifies the butter, which prevents excessive spreading. Ensure your dough is firm before baking. Also, check that your baking soda is fresh and your oven is properly preheated.
Absolutely! The dough can be covered and refrigerated for up to 3 days. For longer storage, freeze the scooped dough balls for up to 3 months. Bake directly from frozen, adding a minute or two to the bake time.
If your butter has black specks and smells acrid, it’s best to start over. Burnt butter will impart a bitter flavor. Next time, use a light-colored pan and medium heat, swirling constantly toward the end to monitor the color change.
Use a large, sharp chef’s knife on a sturdy cutting board. A serrated bread knife also works well. Chop the chocolate bar into uneven pieces, from fine shavings to small chunks. This variety gives you those beautiful melty pools.
You can, but the texture will be different. Chocolate chips are designed to hold their shape. Chopped chocolate melts more readily, creating those lovely pockets. For the best result, I highly recommend sticking with chopped chocolate.
Baking these Brown Butter Chocolate Cookies is more than just following a recipe; it’s about creating a moment of pure joy. The process of browning butter, filling the house with that incredible aroma, and finally pulling a tray of golden, chewy cookies from the oven is my idea of therapy. I hope this recipe becomes a treasured favorite in your home, just as it is in mine. So, preheat that oven, grab your saucepan, and get ready to bake what might just be the best chocolate chip cookies you’ve ever tasted. Happy baking!

Welcome to Mac Recipes! I'm here to prove that amazing home-cooked meals don't need to be complicated. From weeknight dinners to weekend treats, I create recipes that fit into your busy life—delicious, doable, and always worth making.
More About Me