Classic Baked Apples
This post may contain affiliate links.
Read our Disclaimer.
Leave a Comment ★★★★★
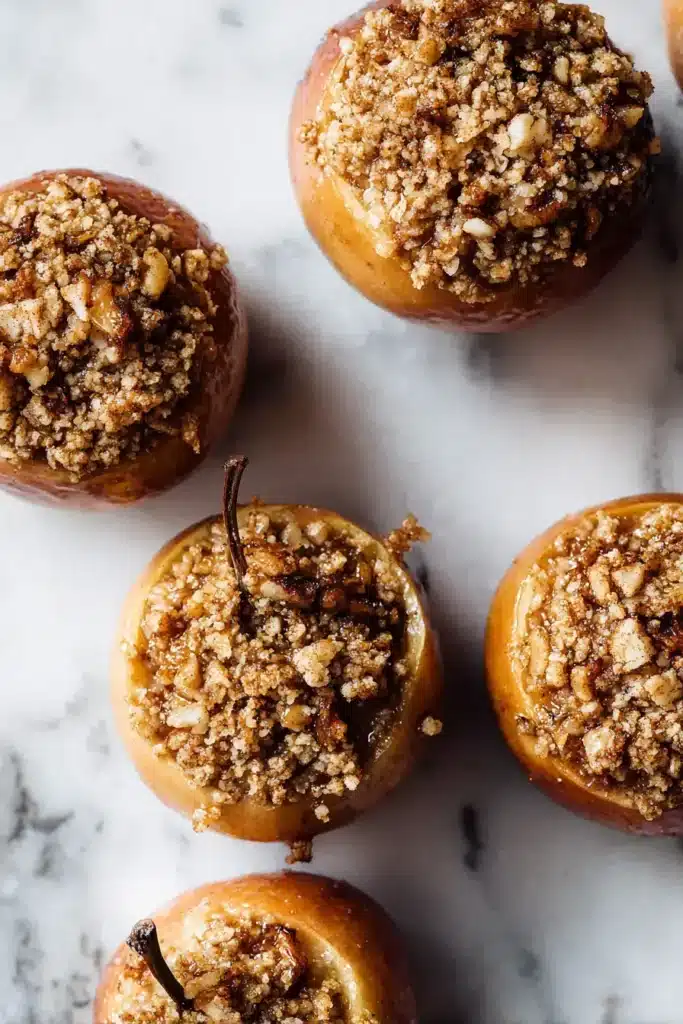
Baked Apples are a timeless dessert that brings the cozy warmth of a nonna’s kitchen into your home. This simple, homemade baked apples recipe uses staple ingredients to create a comforting treat that fills your house with an incredible aroma. It’s a traditional recipe passed down with love, perfect for a quick weeknight dessert or a special gathering.


My dear, don’t you worry about the clock. This is one of those recipes where a little patience brings great reward. The total time is just 55 minutes, with a quick 15 minutes of prep. You’ll have your baked apples in the oven in no time.
The actual baking takes about 40 minutes, which is perfect for setting the table or preparing a simple topping. Compared to many desserts, this apple dessert recipe is quite quick. It’s ideal for a weeknight treat. For another quick dessert idea, you might enjoy our salted caramel apple bars.
In our family, we believe everyone should enjoy a sweet treat. If you’re mindful of sugar, you can easily adapt this baked apple dessert. I’ve served these to family members who are diabetic or simply sugar-conscious, and they always appreciate the thought.
For a low-sugar version, you can reduce the brown sugar by half and add a pinch of stevia. Using a natural sweetener like xylitol is another wonderful option. You could also simply rely on the natural sweetness of the apples themselves. Remember, portion control is a simple way to keep things glucose-friendly.
Over the years, I’ve learned a few secrets that make all the difference. First, for a flavor swap, try using pecans instead of walnuts for a richer taste. It’s a small change that feels luxurious. If you need a diet tweak, gluten-free oats work perfectly in this filling.
For the best texture, make sure your butter is properly softened so it blends easily with the dry ingredients. This prevents a lumpy filling. Finally, if you have leftovers, they reheat beautifully. Simply cover with foil and warm in a 300°F oven for about 15 minutes. For more apple inspiration, check out our homemade apple pie or our delightful apple walnut parfaits.
This dessert is more than just a treat; it’s nourishing. Apples are a fantastic source of dietary fiber, which is wonderful for digestion. The oats add even more fiber and provide sustained energy.
Compared to many desserts, this homemade baked apples recipe is relatively low in added sugars, especially if you use the tweaks I mentioned. You’re also getting nutrients from the walnuts, like healthy fats. It’s a dessert you can feel good about serving. For another nutritious baked option, try our baked salmon. You can learn more about the health benefits of apples from a reliable source like the Harvard T.H. Chan School of Public Health.
If you want to make this dessert even lighter, it’s easily done. You can replace the butter with coconut oil for a dairy-free version. To reduce fat, simply omit the walnuts—the filling will still be delicious.
For a different texture, try using quinoa flakes instead of oats. The goal is to make the recipe work for you. Cooking should be a joy, not a stress. For another simple, lighter dish, our baked cod is a great option.
I remember my grandmother serving these apples straight from the oven, the steam rising like a sweet cloud. The best way to serve baked apples is warm, perhaps with a small scoop of vanilla ice cream melting over the top. The contrast of hot and cold is pure bliss.
They are also wonderful with a dollop of freshly whipped cream or a drizzle of caramel sauce. For a brunch gathering, they pair beautifully with our pumpkin French toast casserole. And if you’re planning a full meal, consider serving them after a hearty main like our garlic herb potato gratin.

Even the best cooks can have a mishap. Let me help you avoid a few common pitfalls. First, why are my apples still hard? This usually means they needed more time in the oven. Make sure to bake until a fork pierces the flesh easily.
Another issue is a soggy filling. How to prevent a soggy filling? Be sure not to overfill the apple cores, and pack the mixture down firmly. If the filling spills out, it can absorb too much liquid. Also, why did my apples collapse? You might have coring them too deeply. Leave a solid base at the bottom to support the structure. For more baking tips, our guide on baked potatoes has great general oven advice. The King Arthur Baking Company also has excellent resources. I learned the hard way about over-coring, but that’s how we gain wisdom in the kitchen.
We rarely have leftovers, but when we do, I treat them like treasure. Allow the apples to cool completely before storing them. Then, place them in an airtight container in the refrigerator, where they will keep for up to three days.
You can also freeze them for longer storage. I reheat them gently in the oven to restore their warm, comforting texture. It’s like enjoying the cozy experience all over again. For another recipe that stores well, our baked brown rice is very versatile.
This recipe is more than just instructions; it’s an invitation to create a moment of warmth. I hope you’ll gather your ingredients and fill your kitchen with the incredible smell of cinnamon and baked fruit. It’s a simple joy that connects generations.
From our table to yours, I send you love and the hope that this recipe becomes a favorite in your home. Once you master this dessert, you might want to try your hand at apple dumplings or a festive apple pie cinnamon rolls. For more apple ideas, explore our apple muffin and easy apple dumplings. This classic baked apples dessert is a perfect place to start your baking journey.
If you enjoyed this traditional treat, here are a few more comforting recipes that celebrate wonderful ingredients.
Apple Dumpling Recipe – a wonderfully spiced and comforting dessert that feels like a hug in a bowl. Pumpkin French Toast Casserole – a make-ahead brunch masterpiece perfect for a lazy weekend morning.Firm, tart apples like Granny Smith or Honeycrisp are the best choices for baked apples because they hold their shape well during cooking. Softer varieties can become mushy. The tartness also provides a lovely contrast to the sweet filling in this apple dessert recipe.
Yes, you can prepare these homemade baked apples ahead of time. Assemble them in the baking dish, cover, and refrigerate for up to 24 hours before baking. You may need to add a few extra minutes to the baking time since they will be going into the oven cold.
The baked apples are done when the flesh is easily pierced with a fork or the tip of a sharp knife. The skin may start to puff up slightly, and the filling will be bubbly and golden brown. The apples should be tender but not completely falling apart.
Absolutely. Allow your baked apples to cool completely, then place them in a freezer-safe container. They can be frozen for up to 3 months. Thaw in the refrigerator overnight and reheat gently in the oven for the best texture. The oats in the filling freeze very well.

Welcome to Mac Recipes! I'm here to prove that amazing home-cooked meals don't need to be complicated. From weeknight dinners to weekend treats, I create recipes that fit into your busy life—delicious, doable, and always worth making.
More About Me